PrestaShop development team has just published the Beta 2 version of PrestaShop 1.4, implementing lots of optimizations:
* Loyalty module has been optimized
* Guest Checkout has been improved
* Tax system is now more efficient
* New features have been added toUPS and USPS modules
* The Back Office Welcome Page has been improved,
* Paypal and MoneyBookers modules have been optimized
The complete list of optimizations is available in the CHANGELOG. Please note that this version is a Beta, and that you should only use it for tests.
Download it now
Wednesday, December 29, 2010
Tuesday, December 28, 2010
PrestaShop Tips - Paypal checkout trouble shooting tips
Order paid but not appear at back office
=========================================
Symptom
Customer successfully paid at Paypal via Express Checkout, but there is no order appear at back office.
Cause
PayPal has changed their “notify_url” behavior sometime recently.
You must enable IPN at your Paypal account to get your Paypal module at PrestaShop work.
If you disable IPN in your PayPal account, no IPNs will be sent regardless of whether you pass a notify_url value.
This issue happens in all Paypal module for PrestaShop if you don't enable IPN
Solution
Enable IPN at your Paypal account
Log in to your Paypal account
Click Profile menu
Click "Instant Payment Notification" in the "Selling Preferences" section
Select enable IPN and input URL where your IPN will be processed.
If you don't have any URL that process IPN, then just set it to your online store root.
You must enable IPN, otherwise Paypal module will not create order because it will not receive payment result data.
This issue happens in all Paypal module for PrestaShop if you don't enable IPN
This solution applies to all Paypal module for PrestaShop including Agile Express Paypal Checkout module.
What Is Agile Paypal Express Checkout?
=====================================
Agile Paypal is a Paypal Express Checkout module for PrestaShop that allow customer use express checkout without requiring customer to sign up/log in. This module will redirect customer to Paypal payment page in less than 3 clicks.
See here for more detail
Wednesday, December 15, 2010
PrestaShop Tips - prestashop-paypal-express-checkout-how-to-change-shipping-address
Some of my customers (PrestaShop store owners) asked me questions about the possibility of changing shipping address when use Express Checkout of Agile Paypal(A PrestaShop Paypal Express Checkout module). It takes a little bit of time to explain to them, so I decided to write post here to share.
Because Express Checkout does require customer to input address information, so most store owners think that customer can only use billing address at Paypal as shipping address. This is a mistake. Customer can choose any other address as shipping address at payment page. Customer even can add new address and register to Paypal at Paypal payment page.
No matter the customer already has Paypal account or use credit/debit credit, the adding/changing shipping address function is always available.
Here is how to change shipping address at Paypal payment page.
1. After you login to Paypal account, you will be prompted to review order and payment information. In this page, there is a "ship to" section as shown below.

Note:
If you don't have Paypal account yet and choose to use credit, after you input credit information, the same screen will be displayed.
2. At above screen, click "change" link. All existing registered addresses will be displayed as below. You could choose any address as shipping address.

3. At above screen, if you would like to add new address, just click "add new", then following screen will appear, you will be able to add new address, and this address will be registered at your Paypal account, you can use it as shipping from now on.

Above function has been confirmed in both real public service environment and SandBox testing Environment.
Agile Paypal is a Paypal Express Checkout module for PrestaShop that allow customer use express checkout without requiring customer to sign up/log in. This module will redirect customer to Paypal payment page in less than 3 clicks. See demo screen or live demo at listed URL below.
See here more detail information
Because Express Checkout does require customer to input address information, so most store owners think that customer can only use billing address at Paypal as shipping address. This is a mistake. Customer can choose any other address as shipping address at payment page. Customer even can add new address and register to Paypal at Paypal payment page.
No matter the customer already has Paypal account or use credit/debit credit, the adding/changing shipping address function is always available.
Here is how to change shipping address at Paypal payment page.
1. After you login to Paypal account, you will be prompted to review order and payment information. In this page, there is a "ship to" section as shown below.

Note:
If you don't have Paypal account yet and choose to use credit, after you input credit information, the same screen will be displayed.
2. At above screen, click "change" link. All existing registered addresses will be displayed as below. You could choose any address as shipping address.

3. At above screen, if you would like to add new address, just click "add new", then following screen will appear, you will be able to add new address, and this address will be registered at your Paypal account, you can use it as shipping from now on.

Above function has been confirmed in both real public service environment and SandBox testing Environment.
What Is Agile Paypal
Agile Paypal is a Paypal Express Checkout module for PrestaShop that allow customer use express checkout without requiring customer to sign up/log in. This module will redirect customer to Paypal payment page in less than 3 clicks. See demo screen or live demo at listed URL below.
See here more detail information
Saturday, December 11, 2010
PrestaShop Tips - Cart is not cleared after payment - how PrestaShop Paypal module process your order
Most PrestaShop store owners and customers are confused by following symptom.
When customer finished payment and is redirected back to PrestaShop store, but customer's cart is still there, not cleared. This issue happens when customer finished payment and click "return to your merchant" store very quickly.
In order to understand how this would happen, you need to understand how the order is process between Paypal payment server and PrestaShop store.
Here is basic process flows:
1.Store redirect customer to Paypal server
(A URL return to PreestaShop store is included in the data posted to Paypal)
2.Ccustomer input required information and perform the payment and finished payment.
3 Paypal show the return URL (which is sent at step 1).
4.Customer click the return link comes back to PrestaShop
5.PrestaShop display payment result.
After above step2, following process started concurrently.
3' Paypal server will validate your payment and send back payment process to PrestaShop store.
4' PrestaShop received validation information about the payment and create order and set order status.
5' If payment status "Payment Accepted", then shopping cart will be cleared.
Please note, above two process is executed concurrently and independently. But both process finishes in a few seconds.
So if Paypal server send back confirmation very quickly or customer waited for a few seconds( reading payment result and so on) then click "return to merchant". There is not problem at all.
But sometime, customer comes back to PrestaShop a little earlier than Paypal server send back "Confirmation" to PrestaShop, then customer "shopping cart not cleared" will occur.
At this point, you should be able to understand how "shopping cart not cleared" happened.

Honestly, I don't think there is a perfect solution. Here is just a suggestion.
At the returning page of PrestaShop store /modules/paypal/confirmation.php/tpl, check if cart is not cleared, then display some message customer about, let customer refresh page after a few seconds.
It seem that Paypal has made some changes on the payment process, after customer finish payment, when customer click "Return to merchant" link, it will pop up a confirm message. I guess this is trying to make some time for Paypal server to have time send "confirmation" to PrestaShop so that avoid above issue.
Agile Paypal - A PrestaShop Paypal Express Checkout module, is very stable, most issues with standard Paypal module will not appear on that module, plus it has many more new features, such as Express Checkout, create state automatically, get to payment in just 3 clicks. See more detail, please visit here
Problems
When customer finished payment and is redirected back to PrestaShop store, but customer's cart is still there, not cleared. This issue happens when customer finished payment and click "return to your merchant" store very quickly.
Why would this happen
In order to understand how this would happen, you need to understand how the order is process between Paypal payment server and PrestaShop store.
Here is basic process flows:
Process from customer view.
1.Store redirect customer to Paypal server
(A URL return to PreestaShop store is included in the data posted to Paypal)
2.Ccustomer input required information and perform the payment and finished payment.
3 Paypal show the return URL (which is sent at step 1).
4.Customer click the return link comes back to PrestaShop
5.PrestaShop display payment result.
Process from Paypal server and PrestaShop view
After above step2, following process started concurrently.
3' Paypal server will validate your payment and send back payment process to PrestaShop store.
4' PrestaShop received validation information about the payment and create order and set order status.
5' If payment status "Payment Accepted", then shopping cart will be cleared.
Please note, above two process is executed concurrently and independently. But both process finishes in a few seconds.
So if Paypal server send back confirmation very quickly or customer waited for a few seconds( reading payment result and so on) then click "return to merchant". There is not problem at all.
But sometime, customer comes back to PrestaShop a little earlier than Paypal server send back "Confirmation" to PrestaShop, then customer "shopping cart not cleared" will occur.
At this point, you should be able to understand how "shopping cart not cleared" happened.
Solutions
Honestly, I don't think there is a perfect solution. Here is just a suggestion.
At the returning page of PrestaShop store /modules/paypal/confirmation.php/tpl, check if cart is not cleared, then display some message customer about, let customer refresh page after a few seconds.
It seem that Paypal has made some changes on the payment process, after customer finish payment, when customer click "Return to merchant" link, it will pop up a confirm message. I guess this is trying to make some time for Paypal server to have time send "confirmation" to PrestaShop so that avoid above issue.
Recommendation
Agile Paypal - A PrestaShop Paypal Express Checkout module, is very stable, most issues with standard Paypal module will not appear on that module, plus it has many more new features, such as Express Checkout, create state automatically, get to payment in just 3 clicks. See more detail, please visit here
Friday, December 10, 2010
PrestaShop Tips - PrestaShop SEO enabled tags cloud module

About Agile SEO Tags
Agile SEO Tags is module block that will display SEO enabled tags clouds block on the left column.
SEO enable or diable is configured at store level at back office Preference tab
Compatible PrestaShop
This module is compatible with PrestaShop 1.2x,1.3x,1.4x
Features
* If your store set to Friendly URL, this module will generate tags cloud with SEO friendly URL automatically
* Each Tag will become another URL http://yuorstore.com/tags/tagname/, this will make search index more pages.
* For each tag, the tag will appear in the following places the page title, the keywords, description

Live Experience and Get it
You can have real experience and get this module at
http://addons-modules.com/
Other Modules
Agile Paypal - A PrestaShop Paypal Express Checkout module, customer get to payment in 3 simple clicks. No SSL, no customer registration, and much more features.
FREE Agile Product Sold counter - PrestaShop module that display product sold counter (number of unit sold) at product page.
FREE AdminCarts modification - Allow you to create order from existing cart in just one click. (Help you restore missed order for some unexpected error)
Wednesday, December 8, 2010
PrestaShop Tips - Wrong shipping address bug in standard Paypal PrestaShop paypal module
If you are PrestaShop store owner and are using standard PrestaShop Paypal payment module, please note that there is a bug if your choose different billing address and shipping address.
If you customer registered two addresses at your PrestShop store and choose to use different address at checkout, the standard prestaShop Paypal will pass billing address(invoice address) as shipping address (delivery address). Your customer will be confused when he/she is redirected to Paypal, because at Paypal payment page, it will display the "billing" address as shipping address.
See attached screen for detail.


This is a minor bug. It will confuse customer.
But if you also use Paypal to print shipping label, then it is a critical issue.
This bug appears in most of the standard Paypal module such as 1.6/1.7/2.0
If you know how how to code PHP, you can fix it in file redirect.php by replacing id_address_invoice with id_address_delivery.
I suggest you buy Agile Paypal - a PrestaShop Express Checkout Module, that you can have many more features such as
Agile Paypal express checkout allow customer go payment in just simple 3 clicks.
Agile Paypal will create a new account automatically with information posted from Paypal if this is the first order of the customer. Customer will receive “Welcome” email.
Agile Paypal will create a new state if the address posted back from Paypal contains state and it is not found in store database. And also an alert email will be sent to store Owner.
You can find Agile Paypal - PrestaShop Paypal Express Checkout here
All bugs found at standard Paypal modules have been fixed at Agile Paypal - PrestaShop Paypal Express Checkout module.
also include this bugs discussed in this post
The Problem
If you customer registered two addresses at your PrestShop store and choose to use different address at checkout, the standard prestaShop Paypal will pass billing address(invoice address) as shipping address (delivery address). Your customer will be confused when he/she is redirected to Paypal, because at Paypal payment page, it will display the "billing" address as shipping address.
See attached screen for detail.


This is a minor bug. It will confuse customer.
But if you also use Paypal to print shipping label, then it is a critical issue.
This bug appears in most of the standard Paypal module such as 1.6/1.7/2.0
Solutions
If you know how how to code PHP, you can fix it in file redirect.php by replacing id_address_invoice with id_address_delivery.
$address = new Address(intval($cart->id_address_invoice));
I suggest you buy Agile Paypal - a PrestaShop Express Checkout Module, that you can have many more features such as
You can find Agile Paypal - PrestaShop Paypal Express Checkout here
All bugs found at standard Paypal modules have been fixed at Agile Paypal - PrestaShop Paypal Express Checkout module.
also include this bugs discussed in this post
Sunday, December 5, 2010
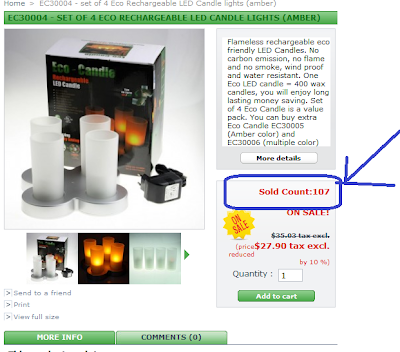
PrestaShop Tips - Free PrestaShop product sold counter is available to download

A free version of PrestaShop product sold counter is available to download.
What is it?
===========
This is free PrestaShop module that will display product sold count (number of unit sold) at product information page.
Compatible Versions
===================
This module should be able to work for PrestaShop 1.2.0 and above
Where to download
=====================
you can download it at here http://prestashop-addons.com/
Monday, November 29, 2010
PrestaShop TIPS - How download a ordered file without log in
At PrestaShop, if you ordered a downloadable product like a eBook,you will receive an mail with a link to download the file. But by default, when you click the link in the email, you will be redirected to authentication page to log in.
This is a normal and safe way, to protect store owner files. But some store owners think it is necessary to do so, because we already have a hashed key in the link something like below.
I also agree, because
It is very hard to figure out the link if you don't know the link. It is secure enough to protect your files.
If someone want to distribute file, he/she doesn't have to distribute the link, he/she could distribute the file itself.
So if you really want make it convenience for customer to download from link in email without logging in, you can make following changes to make this happen.
comment out following two lines (line 55,56) in file get-file.php
This is a normal and safe way, to protect store owner files. But some store owners think it is necessary to do so, because we already have a hashed key in the link something like below.
http://prestashop-addons.com/get-file.php?key=7ce9ab5kdsdfddccfcc.....c392ebe948b2bbfbebf68e
I also agree, because
So if you really want make it convenience for customer to download from link in email without logging in, you can make following changes to make this happen.
comment out following two lines (line 55,56) in file get-file.php
 //if (!$cookie->isLogged())
 // Tools::redirect('authentication.php?back=get-file.php&key='.$key);
PrestaShop Info - New version of PrestaShop Paypal Express Checkout module/addon is relased

A new version of Agile Paypal - A PrestaShop Paypal Express Checkout module is release. In this version, it fixed a a few bugs and support lower version of prestaShop 1.2.x.
This module allow customer check without registration in less than 3 clicks. The module will create/register customer with information from Paypal automatically after payment is done.
Now it supports both PrestaShop 1.2.x and PrestaShop 1.3.x
The module is currently on sale at very low price.
You can order the module here http://prestashop-addons.com/
Features
* Module supports both express checkout and normal checkout* Module allow customer to select Express Checkout or normal checkout with registration.
* When customer choose normal checkout all process will be as just standard PrestaShop.
* Module will ask customer to agrre on "Terms and Conditions" before redirecting to payment.
* Module will create a new account automatically with information from Paypal for the 1st order of the customer. Customer will receive "Welcome" and :Order Confirmation" emails.
* Module will link orders to existing customers by Paypal account email address from 2nd order of same customer.
* Module will create a new state if the address posted back from Paypal contains state which is not found in store database. And also an alert email will be sent to store Owner
Saturday, November 27, 2010
PrestaShop Information - PrestaShop v.1.4 Alpha 3 is available
new PrestaShop 1.4 Alpha version has just been published!
Don’t wait to find out the new features added to the future leading version of the e-commerce solution.
The Template Installer is also one of the new features included in PrestaShop 1.4, to simplify templates installation for merchants, discover it below!
New Features
* Multilingual sitemap with pictures (SEO improvement)
* Geo-localization: Check your visitors’ origin
* Countries are now related to currencies (ability to define currencies depending on the country where the orders are made)
* Taxes and countries are now related (ability to define taxes depending on the country where the orders are made)
* New statistics added to the dashboard and lots of improvements
* Ability to restrict your e-shop access or orders for some countries predefined thanks to geo-localization
* Installation of language packs directly from Prestashop.com
PrestaShop TIPS - How to fix default Carrier issue
In PrestaShop, there is a default carrier setting at back office. But I found there are some issue with AdminCarrier tab in PrestaShop back office.
Issue I found
1. Every time when I update existing carrier, the ID of carrier will be changed. After several time changes, ID of of carrier "CanadPost" from 3 to 35.
2. There is carrier drop down list of carrier for you to set Default Carrier, but no matter you change to which carrier as default and click "Save", the default setting in database never updated. It is kept as original 2.
Problems
Because of above issue, there are a lot of problems will occurs. Here is one of the problem that occurred to me.
Shipping fee is always 0
Solution
The only solution to this issue is manually set default carrier at database.
1. Check the ID of carrier you want it to be Default Carrier at your back office.
2. Go to your database admin tool such as MyPhpAdmin, look for table ps_configuration,
3. Look for record with name = PS_CARRIER_DEFAULT and change the value to the ID of the carrier you want to set.
Done. You have fixed the issue.
Other tips to configure shipping correctly.
1. Check if your zones are set correct, status is active
2. For each shipping country. Shipping zone? Contains state?
3. State, you can set shipping zone at state level
4. Make sure your carrier is available to correct customer groups
Related posts:
http://alvinjiang.blogspot.com/2010/11/prestashop-tips-how-to-set-different.html
http://alvinjiang.blogspot.com/2010/10/prestashop-tips-how-to-fix-address.html
Thursday, November 18, 2010
PrestaShop Tips - How to use Paypal Sandbox test
What is Paypal Sandbox?
Sandbox is a set of tools and resources to enable developers and merchants to develop eCommerce web sites and applications using PayPal web services. Most important purpose is to perform testing.
What you have to do
Most people are confused by Sandbox account and testing account, and so don't know what to do, how to use Sandbox.
Here are basics steps you will need to follow to do test.
1. Sign up an Sandbox access account. By signing up this account, you will gain access to Sandbox. But only this account, you will not able to perform test.
To sign up , click here
To log in, click here
2. Create a Business Sandbox test account to represent your business, seller or merchant. At prestaShop, you will be need set this email address of this account to related Paypal module.
After you logged in to your Sandbox access account. You will see links on the left top corner. "test accounts" is among them. Click this link to start create test account.
3. Create one or more usually Personal Sandbox test account to represent customer, the buyers, purchasers.
After you created those account, now you ready to perform testing.
For more information, visit Paypal Sandbox Overview
Some tips
During your test, you must logged in to Sandbox with your Sandbox access account. Otherwise, following error will appear when you are redirected to Paypal Sandbox.
In order to test with SandBox account, you must remain logged in to Sandbox account.
You will not receive any email from paypal for those Sandbox test accounts. But you will be able to confirm them by access "test email". There is a link locates at the left top corner of your Sandbox access account home page.
Tuesday, November 16, 2010
PrestaShop Information - PrestaShop v.1.4 alpha 2 is available to download for evaluation

PrestaShop takes the leap! Discover today PrestaShop v.1.4 alpha 2. This new version, real milestone for our software, contains more than 50 new features!
New partners joined our solution to help you in every important step of your online activity: customer relationship, payment, marketing, shipping… Our team has also developed a lot of new modules expanding again the features richness of PrestaShop.
Discover in this newsletter a selection of key features that make PrestaShop 1.4 an outstanding version! Please note: this version is currently Alpha 2, so it should not be used in production. Dear contributors do not hesitate to test this version and to report us your comments and suggestions!
Download and try here now
Thursday, November 11, 2010
PrestaShop Tips - Paypal payment module currency conversion issue and customer selected currency issue
What is the problem
If you are using Paypal payment module ver 1.7 at PrestaShop 1.3.2, you will find some issue if you are using more than one currencies.
First, you will need to understand following concepts in PrestaShop
1. Default currency (assume set as: USD)
2. Paypal restricted currency( assume set as Euro)
3. Your store support currencies (assume you set as USD, EURO, GBP,....)
If you want know more about what is "Default currency", " Paypal restricted currency", please see my another post here
Issue/Problem 1: Currency Converting Problem
If customer select currency (e.g. GBP) other than Paypal Restriction Currency (Euro), when customer start checkout, PrestaShop will redirect to Paypal without converting, it means customer will be charged with Euro by the amount of GBP.
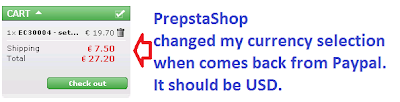
Issue/Problem 2: Customer selected currency
At Paypal payment page, if customer cancel payment and click "Return To Store" (your PrestaShop Store). When customer comes back to your store, all prices of products and shopping cart are displayed as Erro instead of customer selected GBP.
Affected PrestaShop versions
This issue 1 seem only happens on Paypal 1.7 which comes with PrestaShop 1.3.2
The issue 2 seems happens in both Paypal 1.7 and 1.6 which comes with PrestaShop 1.3.1
The solution
To fix issue 1, some more coding is required than fixing issue 2.
I will explained in detail on how to fix issue 2 here.
In the payment module "Agile Paypal", both issues are fixed. "Agile Paypal" is a Express Checkout module that allows customer checkout without sign up to registration or log in.
For more information this module Please Visit Here
If you interested in buying, Please Visit Here.
Or you can have live demo at below sites:
http://ecochoiceshop.com/ (public service)
http://expresscheckout.dyndns.org:8080/demoshop/ (sand box test)
Now, let me show you on how to fix issue 2:
Please apply following two changes to file ./modules/paypal/redirect.php
1. Add following code at position as indicated in the screen shot image below it.
$customercurrency = $cookie->id_currency;

2. Add following code before the end of script as indicated by the screen shot below.
$cookie->id_currency = $customercurrency;

Note:
The above change is for module Paypal 1.7 which comes with PrestaShop 1.3.2
But it should be the similar for other version like module Paypal 16.
osCommerce Website templates - Free template available
What Is osCommerce?
osCommerce website templatesM

>
Most of our templates have online demo, it is better to take a real exprience before you buy any templates.
Here you can browse and experience all our osCommerce Templates
Tuesday, November 9, 2010
PrestaShop Tips - How to set different shipping charge for different state
Sometime, as a PrestaShop store owner, you may want to set different shipping charge for different state or different province, or even different region of the country. The shipping charge calculation at PrestaShop is based on "Zone", not country. So it is very easy to set different shipping charge for different state or province or event different region of same country.
What you have to do is to create different zones for your states/province/region.
For example, you can create Zone "USA East" and zone "USA West", then set different chipping charge for this two zones.
After that, you must go back to change the state setting, to change them from default "USA" zone to "USA East" zone or "USA West" zone.
That's it, very easy.
I have tested this on PrestaShop 1.3.2, it works fine.
Sunday, November 7, 2010
PrestaShop Tips - How to fix cart summary issue
At PrestaShop 1.3 or later (but it will be fixed in ver 1.4), there is a bug at summary of cart block. It does not display correct information when you only have products.
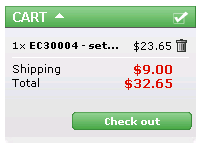
Problem
When you add a product to cart, cart status on header shows “product” but doesn’t show the updated product numbers and its total amount. At the same time, when you click minimize cart block, the cart status also show “product” word like the header.
Solution:
You can fix this problem as following
Find following two lines at modules/blockcart/blockcart.tpl
Replace above two lines with following two lines
Problem
When you add a product to cart, cart status on header shows “product” but doesn’t show the updated product numbers and its total amount. At the same time, when you click minimize cart block, the cart status also show “product” word like the header.
Solution:
You can fix this problem as following
Find following two lines at modules/blockcart/blockcart.tpl
  <span class="ajax_cart_product_txt_s{if $cart_qties < 2} hidden{/if}">{l s='products' mod='blockcart'}</span>
  <span class="ajax_cart_product_txt{if $cart_qties != 1} hidden{/if}">{l s='product' mod='blockcart'}</span>
Replace above two lines with following two lines
  <span class="ajax_cart_product_txt_s{if $cart_qties != 1} hidden{/if}">{l s='products' mod='blockcart'}</span>
  <span class="ajax_cart_product_txt{if $cart_qties < 2} hidden{/if}">{l s='product' mod='blockcart'}</span>
Saturday, November 6, 2010
PrestaShop Modules - Paypal Express checkout module allow check out without signup and login
What is Agile Paypal
Agile Paypal is a Paypal Express Checkout module for PrestaShop that allow customer use express checkout without requiring customer to sign up/log in. This module will redirect customer to Paypal payment page in less than 3 clicks. See demo screen or live demo at listed URL below.

Compatible PrestaShop Version
It is compatible with PrestaShop 1.3.x
It is also compatible with 1.2.x (added on Nov 29)
Express Checkout Screens demo
Just 3 Clicks to Payment (truly Quick, Fast and Express Checkout)

Perform Payment at Paypal

Back to store - "Welcome" email and "Order Confirmation" email received.

Live Demo and Buy it
You can experience Agile Paypal at following sites:
http://ecochoiceshop.com/
http://addons-modules.com/
You can buy this module at here: http://prestashop-addons.com/
Important Notice
This module has fixed some bugs that still appearing on standard module Paypal 1.7(e.g, currency converting issue, customer selected currency lost).
See more information here
Some customer websites using this module
http://milltraders.com/prestashop/
http://www.qyg-online.com/3-accessories-ipod/
http://carnvee.com/
http://kctrading.net/
http://www.blairashby.com/
http://getasword.com/
http://stretchshapes.net/
http://www.brigitta-fashion.hu/
http://mecollectibles.com
http://sodamalt.com
http://littles.myonlineweb.net/
http://worldtopicals.com
http://www.mad-dogs.co.uk/
http://cmfaclothing.com/
http://gwmmo.com/
http://www.cubicmedia.co.uk/
http://www.genuine-by-anthony.com/
http://dru.com.au/yogashop
http://tinyhandsonline.com
Some of the Features
Thursday, November 4, 2010
PrestaShop Tips - How to fix duplicated product SEO friendly URL issue
At Catalog management page of PrestaShop Back office, you can duplicate a product from existing product to create new similar products. This is a good feature/function.
But there is one problem with this feature. If you enable SEO friendly URL at your store, you will find that friendly URL of the new duplicated product is using previous product name.
For example, if you duplicate a product from "Desktop Computer" with id=10 to create a new product "Laptop computer" with id=11. Then the SEO friendly URL of new product will be something like "..../11-Desktop-Computer" instead of "11-Laptop-Computer".
Even you rename the new created product, the friendly URL does not update/change. There is no place at Back Office to change SEO friendly URL for each product. The only way you can fix the problem is to change data in database directly.
Here is how to fix the problem
1. Find the id of product that you want to change for at table ps_product
2. Find the record with same id_product at table ps_product_lang table
3. Change link_rewrite field of this record to the name you want it be.
For example, in above sample, you will need to change "Desktop Computer" to "Laptop Computer" for the record with id_product=11
4. After change all records, try to re-generate .htaccess
(Back office - Preference - Friendly URL section
Wednesday, November 3, 2010
PrestaShop Tips - How to display sold count of product
Most online store owners would like to display sold count (number of units sold) of product to indicate the popularity of a product. At PrestaShop, by default, there is no this function or feature, but you can add this by yourself if you know a little bit PHP coding.
It depends where you want this to show up. Here is the code for displaying sold count on product detail page.
1. at product.php file, look for following line (on the top of the file)
add following code right AFTER above line
2. At . /themes/yourthemes/product.tpl file, look for following line
add following line right AFTER above line
And the result will look like below.
It depends where you want this to show up. Here is the code for displaying sold count on product detail page.
1. at product.php file, look for following line (on the top of the file)
include_once(dirname(__FILE__).'/init.php');
add following code right AFTER above line
$product_sold = Db::getInstance()->getRow('SELECT SUM(product_quantity) as total FROM `'._DB_PREFIX_.'order_detail` where product_id = ' . $_GET['id_product']);
$smarty->assign('product_sold', $product_sold['total']);
2. At . /themes/yourthemes/product.tpl file, look for following line
<p class="price">
add following line right AFTER above line
{l s='Sold Count:'}{$product_sold} <br /><br />
And the result will look like below.

Saturday, October 30, 2010
How to get patameter from querystring of URL
Query string is frequently used for passing variables or parameters between client (browser) to server (web application) when request a web page. Almost all server side languages have standard function to parse query string to get parameters. But sometimes for some reason you will need to variables and parameters at client side. Java Script is most popular client side language, but does not have stand parser to get parameters or variable from Query String.
Here are code some that will help you get variable or parameter from query string of web page URL.
Java Script code (client side code)
Here is PHP code (server side code)
Here are code some that will help you get variable or parameter from query string of web page URL.
Java Script code (client side code)
//--------------------------------------------------------
// Get a querystring parameter/variable value from URL
// If no variable specified, return a default value
//--------------------------------------------------------
function get_param_from_querystring(name, defval)
{
 name = name.replace(/[\[]/,"\\\[").replace(/[\]]/,"\\\]");
 var regex = new RegExp("[\\?&]"+name+"=([^&#]*)");
 var res = regex.exec(window.location.href);
 if(res == null) return defval;
 else  return res[1];
}
Here is PHP code (server side code)
//--------------------------------------------------------
// Get a querystring parameter/variable value from URL
// If no variable specified, return a default value
//--------------------------------------------------------
function get_param_from_querystring($name, $defval)
{
 if(isset($_GET[$name]))return $_GET[$name];
 else return $defval;
}
Friday, October 29, 2010
Web site templates - Christmas Website templates, Christmas flash templates
# The Christmas Website Templates category is exactly what you need to give your website a fresh and glamorous Holiday look. Whether you have an online gift store powered by osCommerce, CRE Loaded or ZenCart, a WordPress blog or any other kind of online website you can be sure that with our Christmas Templates your website will be transformed into a pleasing Holiday vision for your visitors this Christmas Season.
At All Budget Shop, we provide a variety of professional designed ready to use Christmas website templates and flash templates for you for download instantly.
Download your Christmas website templates here.


About Christmas
# Christmas or Christmas Day is a holiday observed mostly on December 25 to commemorate the birth of Jesus, the central figure of Christianity. The date is not known to be the actual birth date of Jesus, and may have initially been chosen to correspond with either the day exactly nine months after some early Christians believed Jesus had been conceived, the date of the winter solstice on the ancient Roman calendar, or one of various ancient winter festivals. Christmas is central to the Christmas and holiday season, and in Christianity marks the beginning of the larger season of Christmastide, which lasts twelve days
# Popular modern customs of the holiday include gift-giving, music, an exchange of greeting cards, church celebrations, a special meal, and the display of various decorations; including Christmas trees, lights, garlands, mistletoe, nativity scenes, and holly.
At All Budget Shop, we provide a variety of professional designed ready to use Christmas website templates and flash templates for you for download instantly.
Download your Christmas website templates here.
About Christmas
# Christmas or Christmas Day is a holiday observed mostly on December 25 to commemorate the birth of Jesus, the central figure of Christianity. The date is not known to be the actual birth date of Jesus, and may have initially been chosen to correspond with either the day exactly nine months after some early Christians believed Jesus had been conceived, the date of the winter solstice on the ancient Roman calendar, or one of various ancient winter festivals. Christmas is central to the Christmas and holiday season, and in Christianity marks the beginning of the larger season of Christmastide, which lasts twelve days
# Popular modern customs of the holiday include gift-giving, music, an exchange of greeting cards, church celebrations, a special meal, and the display of various decorations; including Christmas trees, lights, garlands, mistletoe, nativity scenes, and holly.
PrestaShop Information - a new module iAdvize for customer relation by Chat is released
iAdvize is a client-relation management Chat solution, allowing you to respond directly to a site’s visitors and orient them toward the solution or the product that best fits their needs.

iAdvized contains a dialogue box in the lower part of the screen, which remains visible during navigation, depending on the operators’ availability or the rules or behavioral identification. At any moment the visitor can ask a site representative for some advice or some help navigating around the site.
The iAdvize module will be added by default to version 1.4 of PrestaShop. The compatible module for version 1.3 is already available on our download page. All you have to do is sign up at iadvize.com to activate the code from your PrestaShop Back-Office.
You can download he module iAdvize HERE
For more information about iAdvize, please visit HERE
Sunday, October 24, 2010
PrestaShop Tips - How to setup development on windows flatform
If you are an owner of PrestaShop or you are taking care of someone's PrestaShop website, you maybe want to setup a development environment for your PrestaShop website, because you will have to make some changes or do some customization of the website. It is a not a good practice to make any change directly on your public service PrestaShop website.
All changes and customization must be done at separated environment and tested before they can be applied to public PrestaShop website.
Here I am going to explain on how to setup an WAMP environment on Windows platform.
1. Download WampServer 2.0i
WampServer is an open source project, free to use (GPL licence). Currently stable version is WampServer 2.0i [07/11/09]. It includes following components.
- Apache 2.2.11
- MySQL 5.1.36
- PHP 5.3.0
Please download it from http://www.wampserver.com/en/download.php
You can download it from here : http://www.wampserver.com/en/download.php
2. Run the downloaded installer, and follow the installation guide to finish install.
By default, it will be installed on c:\wamp\
3. Start WAMP Server Manager by double click on c:\wamp\wampmanager.exe
You will see an WAMP server manager appear on the windows right bottom corner.
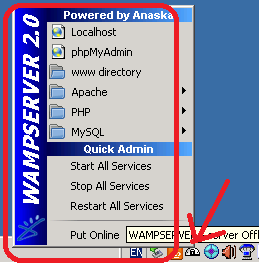
4. Start all service by clicking "WAMP server manager" - "restart all service"
5. You are all set, everything is ready.
Please access http://localhost/phpmyadmin/
So far, your web server are only accessible from local machine by http://localhosst/,
if you want to access your web server from other computer by IP address or hostname,you will encounter error "Forbidden - You don't have permission to access / on this server."
you will need to have make some change on on the configuration file to allow access your WAMP server from other computer.
6. Make your WAMP web server accessible from other computer.
6.1 open file C:\wamp\bin\apache\Apache2.2.11\conf\https.conf
6.2 look for following code
and change the two line bottom two lines to
6.4 Restart all service of your WAMP server as instructed at STEP 4
By now, you should be able to access your WAMP server from other computer.
All changes and customization must be done at separated environment and tested before they can be applied to public PrestaShop website.
Here I am going to explain on how to setup an WAMP environment on Windows platform.
1. Download WampServer 2.0i
WampServer is an open source project, free to use (GPL licence). Currently stable version is WampServer 2.0i [07/11/09]. It includes following components.
- Apache 2.2.11
- MySQL 5.1.36
- PHP 5.3.0
Please download it from http://www.wampserver.com/en/download.php
You can download it from here : http://www.wampserver.com/en/download.php
2. Run the downloaded installer, and follow the installation guide to finish install.
By default, it will be installed on c:\wamp\
3. Start WAMP Server Manager by double click on c:\wamp\wampmanager.exe
You will see an WAMP server manager appear on the windows right bottom corner.

4. Start all service by clicking "WAMP server manager" - "restart all service"
5. You are all set, everything is ready.
Please access http://localhost/phpmyadmin/
So far, your web server are only accessible from local machine by http://localhosst/,
if you want to access your web server from other computer by IP address or hostname,you will encounter error "Forbidden - You don't have permission to access / on this server."
you will need to have make some change on on the configuration file to allow access your WAMP server from other computer.
6. Make your WAMP web server accessible from other computer.
6.1 open file C:\wamp\bin\apache\Apache2.2.11\conf\https.conf
6.2 look for following code
<Directory "c:/wamp/www/">
....
Order deny,allow
Deny from all
and change the two line bottom two lines to
<Directory "c:/wamp/www/">
....
Order allow,deny
 Allow from all
6.4 Restart all service of your WAMP server as instructed at STEP 4
By now, you should be able to access your WAMP server from other computer.
Saturday, October 23, 2010
PrestaShop Information - Offers two new payment options PaysafeCard and Cash-Ticket
PrestaShop offers to its users two new payment options: PaysafeCard and Cash-Ticket.
The products are fast, easy and safe: All the consumer has to do is select one of the products as payment method and enter the 16-digit PIN code printed on the “PaysafeCard” or the “Cash-Ticket”.
For online-shops, offering PaysafeCard or Cash-Ticket means reaching out to new target groups: either those who are concerned about their security when disclosing credit card numbers or bank account details on the Internet, or those who do not have a credit card at all. In addition, PaysafeCard and Cash-Ticket are 100% chargeback-free as they are prepaid methods. The only thing that is required is signing the contract for the product you would like to offer.
Both PaysafeCard and Cash-Ticket will be pre-installed in the 1.4 version of PrestaShop. Compatible modules are already available for PrestaShop v.1.3 on PrestaShop official download page.
Dowwnload PaysafeCard and Cash-Ticket modules for PrestaShop v.1.3
Wednesday, October 20, 2010
PrestaShop Tips - How to add email to invoce and delivery slip
In PrestaShop, the delivery slip and invoice are generated as PDF. Most store owner would like to have some kind of customization, like change format(layout) of delivery and invoice, or add some more information to invoice/delivery.
Here is a very simple example that add customer email address and order # to the delivery and invoice address contact part. This is very easy customization, what you have to do is:
Modify ./classes/PDF.php file as following.
Find following code block by search for !empty($delivery_address->phone_mobile.
Right after above code, add following code
You are ready to go.
Please note:
1. I have tested this on ver 1.3.1 (not sure for other versions)
2. This change will also affect invoice because they share the same content.
Here is a very simple example that add customer email address and order # to the delivery and invoice address contact part. This is very easy customization, what you have to do is:
Modify ./classes/PDF.php file as following.
Find following code block by search for !empty($delivery_address->phone_mobile.
if (!empty($delivery_address->phone_mobile))
{
 $pdf->Ln(5);
 $pdf->Cell($width, 10, $delivery_address->phone_mobile, 0, 'L');
}
Right after above code, add following code
$pdf->Ln(5);
$pdf->Cell($width, 10, $invoice_customer->email, 0, 'L');
$pdf->Ln(5);
$pdf->Cell($width, 10, self::l('ORDER #:') .sprintf('%06d', $order->id), 0, 'L');
You are ready to go.
Please note:
1. I have tested this on ver 1.3.1 (not sure for other versions)
2. This change will also affect invoice because they share the same content.
Tuesday, October 19, 2010
Web site templates - Casino and Online Cansio website templates and flash templates
#Website templates and flash templates at All Budget Shopare ready-made web designs, that can be used as a basis for fast and high-quality website. Those website templates, flash templates and all other products are completely customizable and ready for immediate download. They are best designed by professional designers and provide you with web templates design of premium quality.
#Online casino is a very specific field in e-commerce that is really growing. We offer web templates, flash templates and other templates all with the casino in mind. These templates have all the details that online gamblers want to see.
About Online casino
#Online casinos, also known as virtual casinos or Internet casinos, are online versions of traditional ("brick and mortar") casinos. Online casinos enable gamblers to play and wager on casino games through the Internet.
#Many online casinos lease or purchase their software from well-known companies like Microgaming, Realtime Gaming, Playtech, and CryptoLogic Inc in an attempt to "piggyback" their reputation on the software manufacturer's credibility
#Online casino types: Online casinos can be divided into two groups based on their interface: web-based and download-only casinos. Some casinos offer both interfaces.
# Most popular games offered: Baccarat, Blackjack, Craps, Roulette, Online slot games, Online poker, Keno
PrestaShop Tips - How to enable password confirm at singn up
When you sign up a new account online or at any application, most cases you will be asked to input your password and then re-type it for confirmation to avoid mistakes. But at PrestaShop, you will NOT be asked to input confirm password (re-type your password), this brings trouble to some careless customer who mistypes the password without awareness. Because of this, many store owners are looking for a solution to enable password confirm functionality.
Here you will find the solution that enable your customer to retype password for confirmation (password confirm) at account sign up at PrestaShop.
1. Add a new field to the sing up for password confirm at file ./themes/YourTheme/authentication.tpl.
Search in file authentication.tpl for following blue highlighted text class="required password", you will find following exiting code for password field.
Insert the following new code right after above code.
2. Add validation to validate password is matched at ./authentication.php
Search in file authenticatio.php for following blue highlighted text isSubmit('submitAccount'), you will following code
Append following code right after above code
3. Congratulations! You are done. You can test your work now.
Note:
If your store are supporting multiple language, you will need to translate a new password confirm validation error message.
On how to translate, see PrestaShop related documents.
Here you will find the solution that enable your customer to retype password for confirmation (password confirm) at account sign up at PrestaShop.
1. Add a new field to the sing up for password confirm at file ./themes/YourTheme/authentication.tpl.
Search in file authentication.tpl for following blue highlighted text class="required password", you will find following exiting code for password field.
   <p class="required password">
    <label for="passwd">{l s='Password'}</label>
    <input type="password" class="text" name="passwd" id="passwd" />
    <sup>*</sup>
    <span class="form_info">{l s='(5 characters min.)'}</span>
   </p>
Insert the following new code right after above code.
            <p class="required password">
                <label for="passwd_confirm">{l s='Confirm password'}</label>
                <input type="password" class="text" name="passwd_confirm" id="passwd_confirm" />
                <sup>*</sup>
            </p>
2. Add validation to validate password is matched at ./authentication.php
Search in file authenticatio.php for following blue highlighted text isSubmit('submitAccount'), you will following code
if (Tools::isSubmit('submitAccount'))
{
 $create_account = 1;
 $smarty->assign('email_create', 1);
 $validateDni = Validate::isDni(Tools::getValue('dni'));

 if (!Validate::isEmail($email = Tools::getValue('email')))
  $errors[] = Tools::displayError('e-mail not valid');
 elseif (!Validate::isPasswd(Tools::getValue('passwd')))
  $errors[] = Tools::displayError('invalid password');
Append following code right after above code
 elseif (Tools::getValue('passwd') != Tools::getValue('passwd_confirm'))
  $errors[] = Tools::displayError('your password and confirm password input do not match');
3. Congratulations! You are done. You can test your work now.
Note:
If your store are supporting multiple language, you will need to translate a new password confirm validation error message.
On how to translate, see PrestaShop related documents.
Sunday, October 17, 2010
PrestaShop Tips - How to display user group name on front store
Sometime, you may want to display Group Name information of current logged customer on front store. At current version of PrestaShop(1.3.1), there seems no way to display group name of customer at front store without customization. Here I explain on how to do some small change so that you can display customer group name at User Info Block.
Note:
A customer could belong to multiple group, this customization only bring the group name with largest id which the customer belongs to.
It is possible to bring all group names, it will need more code. Hope you can do it by yourself.
Here is how to do this
1. Adding getGroupName function to Group class.
File: ./classes/Group.php
Go to the bottom of file Group.php, you find following two lines at bottom
Add following code right before above two lines:
2. Getting group name and set to variable
File: ./init.php
Add following line before line 158 and before line 200 (which are exiting lines for customerName)
3. Use it in User Info Block
If you have not installed this block, please do so by go Back Office - Modules - User Info Block.
At line 6 of ./modules/blockuserinfo.tpl, add ", group {$groupName}" after {$customerName}
Before change:
After change:
You are all set. You should be able to see group name of your customer displayed along with his/her name at front store now.
Note:
A customer could belong to multiple group, this customization only bring the group name with largest id which the customer belongs to.
It is possible to bring all group names, it will need more code. Hope you can do it by yourself.
Here is how to do this
1. Adding getGroupName function to Group class.
File: ./classes/Group.php
Go to the bottom of file Group.php, you find following two lines at bottom
}

?>
Add following code right before above two lines:
static public function getGroupName($id_customer, $id_lang)
 {
  $sql = '
  SELECT gl.`name`
  FROM `'._DB_PREFIX_.'group` g
  LEFT JOIN `'._DB_PREFIX_.'customer_group` cg ON (cg.`id_group` = g.`id_group` AND cg.`id_customer` = '.intval($id_customer).')
  LEFT JOIN `'._DB_PREFIX_.'group_lang` AS gl ON (g.`id_group` = gl.`id_group` AND gl.`id_lang` = '.intval($id_lang) . ')
  ORDER BY g.id_group DESC
  ';
  return Db::getInstance()->getValue($sql);
 }
2. Getting group name and set to variable
File: ./init.php
Add following line before line 158 and before line 200 (which are exiting lines for customerName)
'groupName' => ($cookie->id_customer ? Group::getGroupName(intval($cookie->id_customer),intval(_USER_ID_LANG_)) : false),
3. Use it in User Info Block
If you have not installed this block, please do so by go Back Office - Modules - User Info Block.
At line 6 of ./modules/blockuserinfo.tpl, add ", group {$groupName}" after {$customerName}
Before change:
{$customerName} ({l s='Log out' mod='blockuserinfo'})
After change:
{$customerName}, group {$groupName} ({l s='Log out' mod='blockuserinfo'})
You are all set. You should be able to see group name of your customer displayed along with his/her name at front store now.
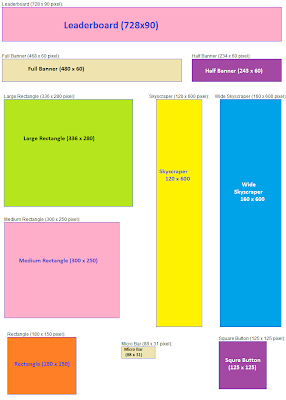
PrestaShop Tips - How to create standard size banners and logo
Recently there are a lot discussion on on the banner ads size. So far there is no any standard banner ads size defined by any organization. But But there are some guidelines from some market leaders worked like Google and Yahoo. Of course, everyone is free to define their own formats but we recommend you design your banners based on the guidelines to correspond with most advertisers.
Here are some of the standard banner ads size based on the guidelines.
Leaderboard (728 x 90 pixel)
Full Banner (468 x 60 pixel):
Half Banner (234 x 60 pixel):
Rectangle (180 x 150 pixel):
Square Button (125 x 125 pixel):
Micro Bar (88 x 31 pixel):
Skyscraper (120 x 600 pixel):
Wide Skyscraper (160 x 600 pixel):
Large Rectangle (336 x 280 pixel):
Medium Rectangle (300 x 250 pixel):
Click the image to see the real size of banner samples below

Thursday, October 14, 2010
PrestaShop Information - PrestaShop has decided to team up with SECUVAD
To help you combat online fraud and recover your outstanding debts, in France and internationally, PrestaShop has decided to team up with SECUVAD, winner of the 2010 E-Commerce Award for Security.
SECUVAD is the leading commercial company engaging in legal battle against fraud and recovering your online unpaid debts.
Just logged an outstanding payment? Forward it to SECUVAD in one click!
Find out all about these new features in the SECUVAD module:
* real-time scoring from 0.15 € + VAT per order
* expert analysis in under 2 hours
* guarantee against unpaid debts
* operational in France and internationally
* legal proceedings against fraudsters
* recovery of online debts
Download the SECUVAD module for PrestaShop
PrestaShop Tips - How to set currency correctly for default currency and Paypal restriction
PrestaShop supports multiple currencies. As a shop owner, you must understand the currency function correctly before you can set your currency related configuration. If you are using Payapl and you don't set it correctly, there might be errors prevent your payment process from going forward.
Here are some of the key points that will help you to understand. This information is for PrestaShop 1.3.1. I have not confirm other version, but I think most of them should have the same concepts.
There is a default currency setting at your back office of your PrestaShop. This currency is used for
A. As currency conversion base
B. Your product price currency (the number you input at product price box, is in this currency)
c. Default currency of your front store displaying currency. User can select different currency. You must install and configure Currency Block to enable this selection.
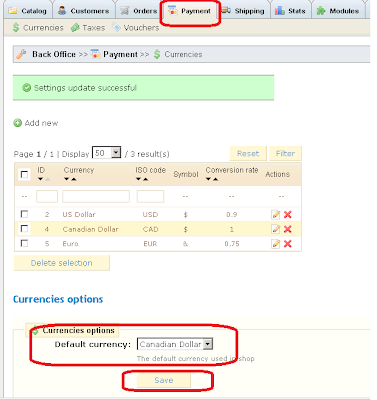
Here is how to configure default currency.
Back office - Payment - Currencies
This currency is used for Paypal payment. No matter what currency user selected at front store, when he/she goes Paypal payment page, PrestaShop will be automatically converted to this currency. The conversion rate is based on your setting at PrestaShop. You can select only one currency as Paypal restriction currency from your available currencies.
Please set your Paypal restriction Currency to your primary currency of your Paypal account to avoid potential errors.
Here is how to set the Paypal Restriction Currency at PrestaShop
Back office - Payment -
Default Currency: CAD (Canadian Dollar)
Paypal Restriction Currency: Euro
Front store selected currency: USD (US dollar)
1. By default the price was displayed as CAD, but selected USD at front store, so it changed to USD correctly.
2. When I went Paypal, it automatically converted to Euro and displayed as Euro at Paypal page. It is also correct as my setting.
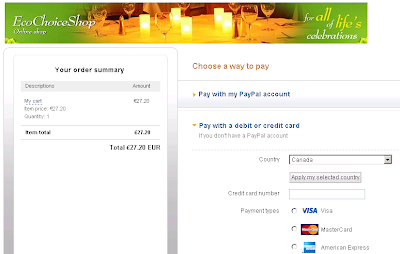
I found one problem when I did my experiment. While I selected USD at front store, went to Paypal page, it displayed Euro (it is as my setting). But when I cancel payment and came back to my home page, it displayed Euro. It seem that PrestaShop automatically change my currency selection. It should be kept my selection as USD. I this is a bug of PrestaShop.
See my another post on issues with Paypal 1.7 here
Here are some of the key points that will help you to understand. This information is for PrestaShop 1.3.1. I have not confirm other version, but I think most of them should have the same concepts.
1. Default currency
There is a default currency setting at your back office of your PrestaShop. This currency is used for
A. As currency conversion base
B. Your product price currency (the number you input at product price box, is in this currency)
c. Default currency of your front store displaying currency. User can select different currency. You must install and configure Currency Block to enable this selection.
Here is how to configure default currency.
Back office - Payment - Currencies

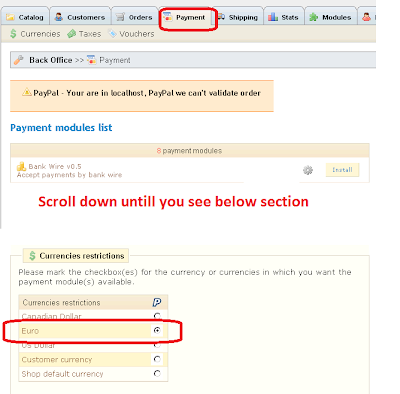
2. Paypal restriction currency.
This currency is used for Paypal payment. No matter what currency user selected at front store, when he/she goes Paypal payment page, PrestaShop will be automatically converted to this currency. The conversion rate is based on your setting at PrestaShop. You can select only one currency as Paypal restriction currency from your available currencies.
Please set your Paypal restriction Currency to your primary currency of your Paypal account to avoid potential errors.
Here is how to set the Paypal Restriction Currency at PrestaShop
Back office - Payment -

My experiment result
Default Currency: CAD (Canadian Dollar)
Paypal Restriction Currency: Euro
Front store selected currency: USD (US dollar)
1. By default the price was displayed as CAD, but selected USD at front store, so it changed to USD correctly.

2. When I went Paypal, it automatically converted to Euro and displayed as Euro at Paypal page. It is also correct as my setting.

Issues(bug?) I found
I found one problem when I did my experiment. While I selected USD at front store, went to Paypal page, it displayed Euro (it is as my setting). But when I cancel payment and came back to my home page, it displayed Euro. It seem that PrestaShop automatically change my currency selection. It should be kept my selection as USD. I this is a bug of PrestaShop.

See my another post on issues with Paypal 1.7 here
PrestaShop Tips - How to set discount for all prodcuts or products in a specific category in a batch way
At PrestaShop, you can set discount by percentage of by amount, or both. But as I know, you can only set this discount for products one by one. If you want to set discount for all products, or all products in a specific category, it will be very time consuming. But if you have access to database, you can use SQL statement to do it in seconds.
Here I introduce some of SQL to set discount for products in a batch way.
1. Set discount for all products.
Please replace YourPercentageDiscount with your discount. For example 25 for 25 percantage.
2. Set discount for all products in a specific category
Please replace YourPercentageDiscount with your discount. For example 25 for 25 percantage.
Please replace YourPercentageDiscount with id_category. You can find id_category at you Back office.
If you want to set discount for all featured product, just replace YouCategpryID ID of id_category of Home which is 1 by default.
How to find id_category of your product categories
Catalog tab

How to find the id_category of Home(featured products)
Catalog Tab - Go any product detail

Here I introduce some of SQL to set discount for products in a batch way.
1. Set discount for all products.
Update `ps_product` set `reduction_percent`=YourPercentageDiscount,`on_sale`=1;
Please replace YourPercentageDiscount with your discount. For example 25 for 25 percantage.
2. Set discount for all products in a specific category
Update `ps_product` set `reduction_percent`=YourPercentageDiscount ,`on_sale`=1
where id_product in
(
select distinct id_product
from ps_category_product
where id_category=YourCategpryID
);
Please replace YourPercentageDiscount with your discount. For example 25 for 25 percantage.
Please replace YourPercentageDiscount with id_category. You can find id_category at you Back office.
If you want to set discount for all featured product, just replace YouCategpryID ID of id_category of Home which is 1 by default.
How to find id_category of your product categories
Catalog tab

How to find the id_category of Home(featured products)
Catalog Tab - Go any product detail

Wednesday, October 13, 2010
PrestaShop Tips - How to add new data fields in email template
At PrestaShop, emails are sent to customer or store owner some kind of events occurs, such as new order confirmation, new account registration.
Some of the email are sent by core PrestaShop, some of them are sent out via additional installed modules, such as mail alerts module.
The mail contents are generated by using email template. The data field which are represented by keywords in the template like {delivery_phone}, {invoice_firstname} are replaced by data from database when email is sent out.
Some time, you want add some more data field to customize default alert email templates. But before you can use keywords at email templates, you must define those keyword first and load data first before you can use it in the mail templates.
Here I try to give some instructions on how to add a new data fields to your email template. For example, you want add phone_mobile to your email.
The keywords are defined in following file
-- Prewstashop core
YourSiteRoot/classes/PaymentModule.php
-- ailalerts module
YourSiteRoot/modules/mailalerts/mailalerts.php
And here is sample code in above file that defines default keywords.
If you want some additional data fields, you have to check if there are existing keywords defined for your data. If not, then you have to find out if the data is defined as property of one of objects that are used in mailalerts.php, like Order, Delivery, Invoice and so on.
Then you can add keyword and property mapping, for example you want add mobile phone number to your email. Then you can implement as following.
1. Define keyword property mapping
2. use the new keywords in your email template.
The alert mail templates are located at following folder
--Core emails
/mails/en/
--Mail Alerts emails
/modules/mailalerts/mails/en/
Please replace /en/ with proper language code that you are using.
Some of the email are sent by core PrestaShop, some of them are sent out via additional installed modules, such as mail alerts module.
The mail contents are generated by using email template. The data field which are represented by keywords in the template like {delivery_phone}, {invoice_firstname} are replaced by data from database when email is sent out.
Some time, you want add some more data field to customize default alert email templates. But before you can use keywords at email templates, you must define those keyword first and load data first before you can use it in the mail templates.
Here I try to give some instructions on how to add a new data fields to your email template. For example, you want add phone_mobile to your email.
The keywords are defined in following file
-- Prewstashop core
YourSiteRoot/classes/PaymentModule.php
-- ailalerts module
YourSiteRoot/modules/mailalerts/mailalerts.php
And here is sample code in above file that defines default keywords.
  $templateVars = array(
   '{firstname}' => $customer->firstname,
   '{lastname}' => $customer->lastname,
   '{email}' => $customer->email,
   '{delivery_company}' => $delivery->company,
   '{delivery_firstname}' => $delivery->firstname,
   '{delivery_lastname}' => $delivery->lastname,
   '{delivery_address1}' => $delivery->address1,
   '{delivery_address2}' => $delivery->address2,
   '{delivery_city}' => $delivery->city,
   '{delivery_postal_code}' => $delivery->postcode,
   '{delivery_country}' => $delivery->country,
   '{delivery_state}' => $delivery->id_state ? $delivery_state->name : '',
   '{delivery_phone}' => $delivery->phone,
   '{delivery_other}' => $delivery->other,
   '{invoice_company}' => $invoice->company,
   '{invoice_firstname}' => $invoice->firstname,
   '{invoice_lastname}' => $invoice->lastname,
   '{invoice_address2}' => $invoice->address2,
   '{invoice_address1}' => $invoice->address1,
   '{invoice_city}' => $invoice->city,
   '{invoice_postal_code}' => $invoice->postcode,
   '{invoice_country}' => $invoice->country,
   '{invoice_state}' => $invoice->id_state ? $invoice_state->name : '',
   '{invoice_phone}' => $invoice->phone,
   '{invoice_other}' => $invoice->other,
   '{order_name}' => sprintf("%06d", $order->id),
   '{shop_name}' => Configuration::get('PS_SHOP_NAME'),
   '{date}' => $order_date_text,
   '{carrier}' => (($carrier->name == '0') ? Configuration::get('PS_SHOP_NAME') : $carrier->name),
   '{payment}' => $order->payment,
   '{items}' => $itemsTable,
   '{total_paid}' => Tools::displayPrice($order->total_paid, $currency),
   '{total_products}' => Tools::displayPrice($order->getTotalProductsWithTaxes(), $currency),
   '{total_discounts}' => Tools::displayPrice($order->total_discounts, $currency),
   '{total_shipping}' => Tools::displayPrice($order->total_shipping, $currency),
   '{total_wrapping}' => Tools::displayPrice($order->total_wrapping, $currency),
   '{currency}' => $currency->sign,
   '{message}' => $message
  );
If you want some additional data fields, you have to check if there are existing keywords defined for your data. If not, then you have to find out if the data is defined as property of one of objects that are used in mailalerts.php, like Order, Delivery, Invoice and so on.
Then you can add keyword and property mapping, for example you want add mobile phone number to your email. Then you can implement as following.
1. Define keyword property mapping
'{invoice_phone_mobile}' => $invoice->phone_mobile,
....
'{delivery_phone_mobile}' => $delivery->phone_mobile,
2. use the new keywords in your email template.
The alert mail templates are located at following folder
--Core emails
/mails/en/
--Mail Alerts emails
/modules/mailalerts/mails/en/
Please replace /en/ with proper language code that you are using.
Monday, October 11, 2010
PrestaShop Tips - How to fix hack attempt error
At PrestaShop, if the system detect any inconsistent data, it will display "Hack Attempt". You will be surprised when you see this error. But in most cases, it is not because of hack attack. It is because of consistent data detected.
Here are a few of those cases that will cause this error.
1. If you use bookmark of a URL of PrestaShop site, and the URL contains some kind of token, next time when you access the same site from the bookmarked URL, this error will occurs.
2. If the address ID in an order record could not be found at address table, this error will also occur.
3. If your state ID in your address record could not be found in state table.
4. The system can not find the default country.
You can define default country at back office - shipping - countries
These are just a few examples.
If you experience this error, but you don't think is it hack attack, then try to figure if there is any data problem.
Saturday, October 9, 2010
PrestaShop Tips - How to make order number, delivery number and invoice number the same?
At PrestaShop, order number, invoice number and delivery numbers are issued separately and independently. I think that it is nature to have different order/invoice/delivery numbers. It is kind of business activity log of your store.
But for management convenience purpose, some store owners may want to keep the following three numbers same, but have different prefix.
- order number, for example Ord20021
- invoice number, for example, Inv20021
- delivery number, for example DLR20021
This approach is not recommended, but doable with some code changes. If you really want to make all those numbers to be the same, you have an option to do so in following way. The key points of this approach are:
1. Keep invoice/delivery ID as it is in database
2. Use order # for other (invoice/delivery) numbers when display on UI
3. Use the Order # for other (invoice/delivery) numbers when generate PDF document
How to make this happen?
Note
A. The line number below are for reference purpose only, they might be slightly different at your copy of version. Please search the keyword to find the exact locations.
B. The changes listed here are just guidance purpose, I have not tested it yet. Please do test it by yourself before put it in service.
1. Make delivery number the same as that of order #
Replace following lines "$order->delivery_number" to "$order->id"(5 files, 7 lines)
2. Make invoice number the same as that of order #
Replace following lines "$order->invoice_number" to "$order->id" (7 files, 15 lines)
But for management convenience purpose, some store owners may want to keep the following three numbers same, but have different prefix.
- order number, for example Ord20021
- invoice number, for example, Inv20021
- delivery number, for example DLR20021
This approach is not recommended, but doable with some code changes. If you really want to make all those numbers to be the same, you have an option to do so in following way. The key points of this approach are:
1. Keep invoice/delivery ID as it is in database
2. Use order # for other (invoice/delivery) numbers when display on UI
3. Use the Order # for other (invoice/delivery) numbers when generate PDF document
How to make this happen?
Note
A. The line number below are for reference purpose only, they might be slightly different at your copy of version. Please search the keyword to find the exact locations.
B. The changes listed here are just guidance purpose, I have not tested it yet. Please do test it by yourself before put it in service.
1. Make delivery number the same as that of order #
Replace following lines "$order->delivery_number" to "$order->id"(5 files, 7 lines)
  \admin168\pdf.php(line:48): PDF::invoice($order, 'D', false, $tmp, false, $order->delivery_number);
  \admin168\tabs\AdminOrders.php(line:434):   (($currentState->delivery OR $order->delivery_number) ? ' - <a href="pdf.php?id_delivery='.$order->delivery_number.'"><img src="../img/admin/delivery.gif" alt="'.$this->l('View delivery slip').'" title="'.$this->l('View delivery slip').'" /></a>' : '').
  \admin168\tabs\AdminOrders.php(line:527):   '.(($currentState->delivery OR $order->delivery_number) ? '<br /><a href="pdf.php?id_delivery='.$order->delivery_number.'">'.$this->l('Delivery slip #').'<b>'.Configuration::get('PS_DELIVERY_PREFIX', intval($cookie->id_lang)).sprintf('%06d', $order->delivery_number).'</b></a><br />' : '');
  \classes\Order.php(line:693):  $this->delivery_number = $number;
  \classes\Order.php(line:716):  if ($orderState->delivery OR $order->delivery_number)
  \classes\Order.php(line:717):   echo '<a href="pdf.php?id_delivery='.intval($order->delivery_number).'"><img src="../img/admin/delivery.gif" alt="delivery" /></a>';
  \classes\OrderHistory.php(line:93):   if ($newOS->delivery AND !$order->delivery_number)
  \classes\PDF.php(line:219):    PDF::invoice($orderObj, 'D', true, $pdf, false, $orderObj->delivery_number);
2. Make invoice number the same as that of order #
Replace following lines "$order->invoice_number" to "$order->id" (7 files, 15 lines)
  \admin168\tabs\AdminOrders.php(line:433):   ((($currentState->invoice OR $order->invoice_number) AND count($products)) ? ' - <a href="pdf.php?id_order='.$order->id.'&pdf"><img src="../img/admin/tab-invoice.gif" alt="'.$this->l('View invoice').'" title="'.$this->l('View invoice').'" /></a>' : '').
  \admin168\tabs\AdminOrders.php(line:513):  if (($currentState->invoice OR $order->invoice_number) AND count($products))
  \admin168\tabs\AdminOrders.php(line:517):    <a href="pdf.php?id_order='.$order->id.'&pdf">'.$this->l('Invoice #').'<b>'.Configuration::get('PS_INVOICE_PREFIX', intval($cookie->id_lang)).sprintf('%06d', $order->invoice_number).'</b></a>
  \classes\Order.php(line:158):  $fields['invoice_number'] = intval($this->invoice_number);
  \classes\Order.php(line:677):  $this->invoice_number = $number;
  \classes\Order.php(line:710):  if (($orderState->invoice OR $order->invoice_number) AND intval($tr['product_number']))
  \classes\OrderHistory.php(line:91):   if ($newOS->invoice AND !$order->invoice_number)
  \classes\PaymentModule.php(line:342):     if (intval(Configuration::get('PS_INVOICE')) AND Validate::isLoadedObject($orderStatus) AND $orderStatus->invoice AND $order->invoice_number)
  \classes\PaymentModule.php(line:345):      $fileAttachment['name'] = Configuration::get('PS_INVOICE_PREFIX', intval($order->id_lang)).sprintf('%06d', $order->invoice_number).'.pdf';
  \classes\PDF.php(line:150):  elseif (self::$order->invoice_number)
  \classes\PDF.php(line:151):   $this->Cell(77, 10, self::l('INVOICE #').' '.Configuration::get('PS_INVOICE_PREFIX', intval($cookie->id_lang)).sprintf('%06d', self::$order->invoice_number), 0, 1, 'R');
  \classes\PDF.php(line:354):  if (!Validate::isLoadedObject($order) OR (!$cookie->id_employee AND (!OrderState::invoiceAvailable($order->getCurrentState()) AND !$order->invoice_number)))
  \classes\PDF.php(line:443):   $pdf->Cell(0, 6, self::l('INVOICE #').Configuration::get('PS_INVOICE_PREFIX', intval($cookie->id_lang)).sprintf('%06d', self::$order->invoice_number).' '.self::l('from') . ' ' .Tools::displayDate(self::$order->invoice_date, self::$order->id_lang), 1, 2, 'L', 1);
  \order-detail.php(line:88):   'invoice' => (OrderState::invoiceAvailable(intval($id_order_state)) AND $order->invoice_number),
  \pdf-invoice.php(line:17):elseif (!OrderState::invoiceAvailable($order->getCurrentState()) AND !$order->invoice_number)
Subscribe to:
Posts (Atom)